Thursday 9 October 2014

ESXi Host VMNic settings


Enable / Disable ESXi host nic on the fly:

~ # esxcli network nic down -n vmnic1
~ # esxcli network nic up -n vmnic1


Change the FlowControl on the nic

~ # ethtool --pause vmnic1 autoneg on
~ # ethtool --pause vmnic1 tx on rx on

OR OFF
~ # ethtool --pause vmnic1 autoneg off
~ # ethtool --pause vmnic1 tx off rx off

View the Flow Control settings

~ # ethtool --show-pause vmnic1

Thursday 25 September 2014

Powershell Store Credentials for a Script to avoid Password Prompt

#Script : To get Credential as SECURE STRING and save in Local Drive

Read-Host "Enter the password" -AsSecureString | ConvertFrom-SecureString | Out-File C:\SecureData\SecureString.txt

#Script : To Execute PowerShell script with other credentials without prompts

$Uname = "DOMAIN\ADMIN"
$Password = Get-Content C:\SecureDate\securestring.txt | convertto-securestring
$Credential = new-object -typename System.Management.Automation.PSCredential -argumentlist $Uname, $Password

Tuesday 8 July 2014

Export and Import DNS zone

From Source server:
run this from command prompt to export > dnscmd  /zoneexport zonename.com zonename.com.bak

Note that the backup file you have created will land in %systemroot%\System32\dns
Move the file to Destination server\ %systemroot%\System32\dns
Rename from .bak to .dns

From Destination Server:
Delete existing  zone if it already exist
Create new zone using file zonename.com.dns

Query LDAP & Global Catalog servers with NSLOOKUP

nslookup -type=srv _ldap._tcp.DOMAINNAME

Monday 16 June 2014

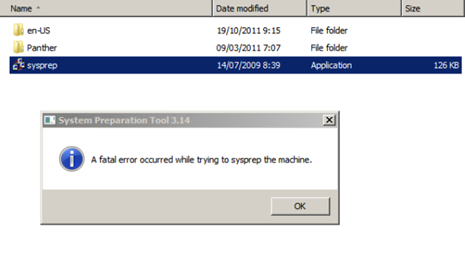
Windows 2008 r2 sysprep – A fatal error occurred while trying to sysprep the machine - Windows Could Not parse or process unattend answer file for pass

Windows 2008 r2 sysprep – A fatal error occurred while trying to sysprep the machine 

AND
 Windows Could Not parse or process unattend answer file for pass


When I run sysprep, I found an error message “A Fatal error occurred trying to sysprep the machine”

To solved this problem, I do a this workaround :
  • Change registry key HKEY_LOCAL_MACHINE\SYSTEM\Setup\Status\SysprepStatus to 7

  • Change HKEY_LOCAL_MACHINE\Software\Microsoft\Windows NT\CurrentVersion\SoftwareProtectionPlatform\SkipRearm to 1
  • And then Delete the folder Panther.

  • And then run sysprep again.


After reboot when the installation  through following error message


"Windows could not parse or process unattend answer file [C:\windows\Panther\unattend.xml] for pass [specialize]. A component or setting specified in the answer file does not exist"
do This:

  1. Press SHIFT+F10 to open a command prompt
  2. type regedit
  3. in registry editor navigate to:
  4. HKLM/SYSTEM/Setup/Status/ChildCompletion
  5. if setup.exe is 1, change it to 3.
  6. restart

Wednesday 26 February 2014

Export and Import NTFS permission with Powershell from one domain to another

Steps:
Export Permissions
Modify the permissions.csv file - Change the domain name
Import permissions

Assumptions:
User name are same in both domains
Folder structure remains the same

Exports.ps1
Get-ChildItem "S:\Folder" -Recurse | ?{ $_.PsIsContainer } | %{
  $Path = $_.FullName
  # Exclude inherited rights from the report
  (Get-Acl $Path).Access | ?{ !$_.IsInherited } | Select-Object `
    @{n='Path';e={ $Path }}, IdentityReference, AccessControlType, `
    InheritanceFlags, PropagationFlags, FileSystemRights
} | Export-CSV "c:\temp\Permissions.csv"

Import.ps1
$par = Import-Csv -Path "c:\temp\Permissions.csv"

foreach ( $i in $par )
 {
 $path= $i.Path
 $IdentityReference= $i.IdentityReference
        $AccessControlType=$i.AccessControlType
        $InheritanceFlags= $i.InheritanceFlags
        $PropagationFlags=$i.PropagationFlags
        $FileSystemRights=$i.FileSystemRights
        echo $path $IdentityReference
        $acl = Get-Acl c:\temp
        $permission = $i.IdentityReference,$i.FileSystemRights,$i.AccessControlType
        $accessRule = new-object System.Security.AccessControl.FileSystemAccessRule $permission
        $acl.SetAccessRule($accessRule)
        #$objACE = New-Object System.Security.AccessControl.FileSystemAccessRule     ($IdentityReference, $FileSystemRights, $InheritanceFlags, $PropagationFlags, $AccessControlType)
        #$objACL.AddAccessRule($objACE)
        $acl | Set-Acl $path
        }


Friday 21 February 2014

Release Mapped Files from Memory

User RAMMap to identify the leaked memory if a mapped file is cause of the problem then use following to fix this immediately:

1. Highlist the Mapped file
2. From Menu select 'Empty' > 'Empty Working Sets'
3. All the locked memory should be released, press F5 to refresh see the Mapped file total moved to Standby.
4. Again select 'Empty' from Menu bar > Empty Standby
5. F5 to refresh