Thursday, 9 July 2015

Batch log file with name and date

cscript example.vbs > %computername%_%date:~-4,4%%date:~-10,2%%date:~-7,2%_%time:~0,2%%time:~3,2%%time:~6,2%.log

Output:
MyComputer_20150907_144646.log

Thursday, 9 October 2014

ESXi Host VMNic settings


Enable / Disable ESXi host nic on the fly:

~ # esxcli network nic down -n vmnic1
~ # esxcli network nic up -n vmnic1


Change the FlowControl on the nic

~ # ethtool --pause vmnic1 autoneg on
~ # ethtool --pause vmnic1 tx on rx on

OR OFF
~ # ethtool --pause vmnic1 autoneg off
~ # ethtool --pause vmnic1 tx off rx off

View the Flow Control settings

~ # ethtool --show-pause vmnic1

Thursday, 25 September 2014

Powershell Store Credentials for a Script to avoid Password Prompt

#Script : To get Credential as SECURE STRING and save in Local Drive

Read-Host "Enter the password" -AsSecureString | ConvertFrom-SecureString | Out-File C:\SecureData\SecureString.txt

#Script : To Execute PowerShell script with other credentials without prompts

$Uname = "DOMAIN\ADMIN"
$Password = Get-Content C:\SecureDate\securestring.txt | convertto-securestring
$Credential = new-object -typename System.Management.Automation.PSCredential -argumentlist $Uname, $Password

Tuesday, 8 July 2014

Export and Import DNS zone

From Source server:
run this from command prompt to export > dnscmd  /zoneexport zonename.com zonename.com.bak

Note that the backup file you have created will land in %systemroot%\System32\dns
Move the file to Destination server\ %systemroot%\System32\dns
Rename from .bak to .dns

From Destination Server:
Delete existing  zone if it already exist
Create new zone using file zonename.com.dns

Query LDAP & Global Catalog servers with NSLOOKUP

nslookup -type=srv _ldap._tcp.DOMAINNAME

Monday, 16 June 2014

Windows 2008 r2 sysprep – A fatal error occurred while trying to sysprep the machine - Windows Could Not parse or process unattend answer file for pass

Windows 2008 r2 sysprep – A fatal error occurred while trying to sysprep the machine 

AND
 Windows Could Not parse or process unattend answer file for pass


When I run sysprep, I found an error message “A Fatal error occurred trying to sysprep the machine”

To solved this problem, I do a this workaround :
  • Change registry key HKEY_LOCAL_MACHINE\SYSTEM\Setup\Status\SysprepStatus to 7

  • Change HKEY_LOCAL_MACHINE\Software\Microsoft\Windows NT\CurrentVersion\SoftwareProtectionPlatform\SkipRearm to 1
  • And then Delete the folder Panther.

  • And then run sysprep again.


After reboot when the installation  through following error message


"Windows could not parse or process unattend answer file [C:\windows\Panther\unattend.xml] for pass [specialize]. A component or setting specified in the answer file does not exist"
do This:

  1. Press SHIFT+F10 to open a command prompt
  2. type regedit
  3. in registry editor navigate to:
  4. HKLM/SYSTEM/Setup/Status/ChildCompletion
  5. if setup.exe is 1, change it to 3.
  6. restart

Wednesday, 26 February 2014

Export and Import NTFS permission with Powershell from one domain to another

Steps:
Export Permissions
Modify the permissions.csv file - Change the domain name
Import permissions

Assumptions:
User name are same in both domains
Folder structure remains the same

Exports.ps1
Get-ChildItem "S:\Folder" -Recurse | ?{ $_.PsIsContainer } | %{
  $Path = $_.FullName
  # Exclude inherited rights from the report
  (Get-Acl $Path).Access | ?{ !$_.IsInherited } | Select-Object `
    @{n='Path';e={ $Path }}, IdentityReference, AccessControlType, `
    InheritanceFlags, PropagationFlags, FileSystemRights
} | Export-CSV "c:\temp\Permissions.csv"

Import.ps1
$par = Import-Csv -Path "c:\temp\Permissions.csv"

foreach ( $i in $par )
 {
 $path= $i.Path
 $IdentityReference= $i.IdentityReference
        $AccessControlType=$i.AccessControlType
        $InheritanceFlags= $i.InheritanceFlags
        $PropagationFlags=$i.PropagationFlags
        $FileSystemRights=$i.FileSystemRights
        echo $path $IdentityReference
        $acl = Get-Acl c:\temp
        $permission = $i.IdentityReference,$i.FileSystemRights,$i.AccessControlType
        $accessRule = new-object System.Security.AccessControl.FileSystemAccessRule $permission
        $acl.SetAccessRule($accessRule)
        #$objACE = New-Object System.Security.AccessControl.FileSystemAccessRule     ($IdentityReference, $FileSystemRights, $InheritanceFlags, $PropagationFlags, $AccessControlType)
        #$objACL.AddAccessRule($objACE)
        $acl | Set-Acl $path
        }


Friday, 21 February 2014

Release Mapped Files from Memory

User RAMMap to identify the leaked memory if a mapped file is cause of the problem then use following to fix this immediately:

1. Highlist the Mapped file
2. From Menu select 'Empty' > 'Empty Working Sets'
3. All the locked memory should be released, press F5 to refresh see the Mapped file total moved to Standby.
4. Again select 'Empty' from Menu bar > Empty Standby
5. F5 to refresh

Thursday, 12 December 2013

Restart Windows Internal Database

NET STOP MSSQL$MICROSOFT##SSEE
NET START MSSQL$MICROSOFT##SSEE

Wednesday, 18 September 2013

Message Tracking in Exchange 2010 Using PowerShell

Get-MessageTrackingLog -Server Mailbox01 -Start "03/13/2013 09:00:00" -End "03/15/2013 17:00:00" -Sender "john@contoso.com"


$Temp = Search-MessageTrackingReport -Identity "David Jones" -Recipients "wendy@contoso.com"
 
$Temp | %{ Get-MessageTrackingReport -Identity $_.MessageTrackingReportId -BypassDelegateChecking }


http://www.mikepfeiffer.net/2012/01/generating-delivery-reports-and-tracking-messages-from-powershell/ 

Monday, 12 August 2013

This method is disabled by 'moref=vm-ID'


If you get this message when you are trying to Storage Vmotion a VM then this is likely to be a lock in vCentre SQL database for this VM, mostly put in place by the backup system e.g. Netbackup, Veeam etc

Vmware KB 2008957 has all the step to resolve the issue but I found that restarting SQL services is not really required. Carryout all the steps from 1 - 6 and then rerun that backup (incremental is good enough) and then do Storage Vmotion again...


  1. Stop the vCenter Services.
  2. Take a backup of the vCenter Server database.
  3. Run this command against the vCenter Server database.

    select * from VPX_VM WHERE FILE_NAME LIKE '%Virtual-Machine-Name%'
  4. Take note of the numerical ID value returned by the SQL statement in step 3, as this will be required in the SQL statement in steps 5 and 6.
  5. To confirm the stale entry, run this command against the vCenter Server database:

    select * from VPX_DISABLED_METHODS WHERE ENTITY_MO_ID_VAL = 'vm-ID from step 4'
  6. To remove the stale entry run this command against the vCenter Server database:

    delete from VPX_DISABLED_METHODS WHERE ENTITY_MO_ID_VAL = 'vm-ID from step 4'

Thursday, 30 May 2013

ESXi 5.1 not detecting HBA adapter

Steps:

1) Make sure HBA is connected on the PCI slot and visible under esx hardware list:

esxcli hardware pci list

2) Check if VMKernel can detect any storage via Fibre Channel

esxcli storage san fc list
 
(output will be blank line if HBA driver is missing but HBA appears to be in PCI card determined from step 1)
esxcli storage core adapter rescan

3) Search and download the relevant ESXi drivers for HBA

the recommended driver (bfa) version for 82B in ESXi 5.1 is 3.0.0.0
You can download it from the following URL.
https://my.vmware.com/web/vmware/details?downloadGroup=DT-ESXi50-BROCADE-bfa-3000&productId=229


4) Download the driver and install it using following instructions:

New Installation
----------------

For new installs, you should perform the following steps:

    1. Copy the VIB to the ESX server.  Technically, you can
           place the file anywhere that is accessible to the ESX console shell,
           but for these instructions, we'll assume the location is in '/tmp'.

           Here's an example of using the Linux 'scp' utility to copy the file
           from a local system to an ESX server located at 10.10.10.10:
             scp VMware_bootbank_net-driver.1.1.0-1vmw.0.0.372183.vib root@10.10.10.10:/tmp

    2. Issue the following command (full path to the VIB must be specified):
              esxcli software vib install -v {VIBFILE}
      
           In the example above, this would be:
              esxcli software vib install -v /tmp/VMware_bootbank_net-driver.1.1.0-1vmw.0.0.372183.vib

Note: Depending on the certificate used to sign the VIB, you may need to
      change the host acceptance level.  To do this, use the following command:
        esxcli software acceptance set --level=<level>
      Also, depending on the type of VIB being installed, you may have to put
      ESX into maintenance mode.  This can be done through the VI Client, or by
      adding the '--maintenance-mode' option to the above esxcli command.


Upgrade Installation
--------------------

The upgrade process is similar to a new install, except the command that should
be issued is the following:

    esxcli software vib upgrade -v {VIBFILE}


Tuesday, 28 May 2013

ESXi host 4.1 to 5.1 upgrade stuck on 22%


If your ESXi host update from v4.1 to 5.1 stalls, crashes or freezes on 22% don't panic wait for it to finish if no joy then next time don't forget to untick disable DPM box in the upgrade wizard, works for me every time.

When it happened first time, I remotely accessed the host and found esxi host frozen on loading screen (black & yellow) on Power management services.


Monday, 20 May 2013

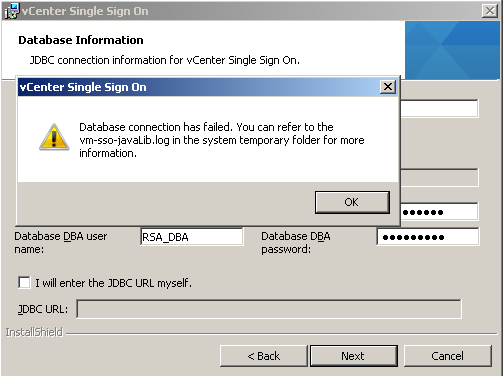
vCentre Single Sign On Database Connection has failed

When I came across this error
"Databse connection has failed. You can refer to the vm-sso-javaLib.log in the system temporary folder for more information" during the installation of vSphere 5.1 SSO.

I fixed it my changing MS SQL Database authentication from Windows to SQL and Windows mixed authentication.


Godd Luck!!

Tuesday, 7 May 2013

Power off unresponsive VM

Using the ESXi 5.x esxcli command to power off a virtual machine

The esxcli command can be used locally or remotely to power off a virtual machine running on ESXi 5.x. For more information, see the esxcli vm Commands section of the vSphere Command-Line Interface Reference.
  1. Open a console session where the esxcli tool is available, either in the ESXi Shell, the vSphere Management Assistant (vMA), or the location where the vSphere Command-Line Interface (vCLI) is installed.

  2. Get a list of running virtual machines, identified by World ID, UUID, Display Name, and path to the .vmx configuration file, using this command:

    esxcli vm process list

  3. Power off one of the virtual machines from the list using this command:

    esxcli vm process kill --type=[soft,hard,force] --world-id=WorldNumber

    Notes:
    Three power-off methods are available. Soft is the most graceful, hard performs an immediate shutdown, and force should be used as a last resort.
    Alternate power off command syntax is: esxcli vm process kill -t [soft,hard,force] -w WorldNumber

  4. Repeat Step 2 and validate that the virtual machine is no longer running.
For ESXi 4.1:
  1. Get a list of running virtual machines, identified by World ID, UUID, Display Name, and path to the .vmx configuration file, using this command:

    esxcli vms vm list

  2. Power off one of the virtual machines from the list using this command:

    esxcli vms vm kill --type=[soft,hard,force] --world-id=WorldNumber

Using the ESXi command-line utility vim-cmd to power off the virtual machine

  1. On the ESXi console, enter Tech Support mode and log in as root. For more information, see Tech Support Mode for Emergency Support (1003677).
  2. Get a list of all registered virtual machines, identified by their VMID, Display Name, and path to the .vmx configuration file, using this command:

    vim-cmd vmsvc/getallvms

  3. To get the current state of a virtual machine:

    vim-cmd vmsvc/power.getstate VMID

  4. Shutdown the virtual machine using the VMID found in Step 2 and run:

    vim-cmd vmsvc/power.shutdown VMID

    Note: If the virtual machine fails to shut down, use this command:

    vim-cmd vmsvc/power.off VMID


    http://kb.vmware.com/selfservice/microsites/search.do?language=en_US&cmd=displayKC&externalId=1014165

Wednesday, 1 May 2013

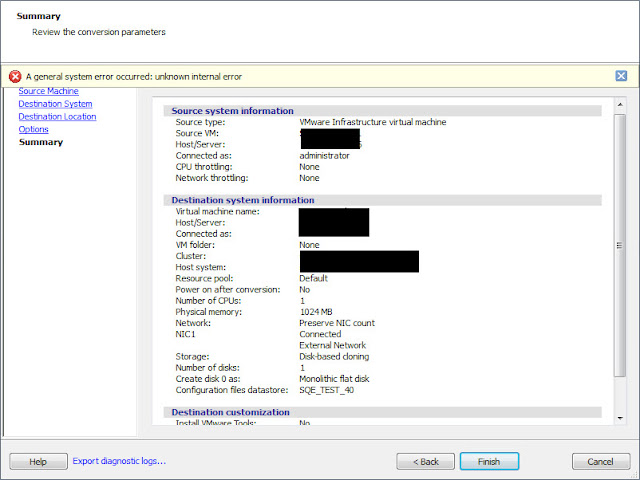
VMWare vConverter A General System error occurred: unknown internal error


If you come across following error whilst converting Physical machine to Virtual using VMware vCenter Converter Standalone version 5.x use following steps to overcome this message (i found these steps from different forums which seemed to have worked for some people but what worked for me is Step4).

A general system error occurred: unknown internal error.

1. Click Finish again to ignore and complete the P2V
2. From Server TCP/IP settings remove static IP addresses and set dynamic IP detection
3. (Source: VMware vConverter release notes) On ESX hosts earlier than 5.0 and managed by vCenter Server, you cannot submit conversion jobs if the name of the destination datastore contains non-ASCII characters
When you click Finish in the Conversion wizard, the following error message appears: A general system error occurred: unknown internal error. This issue is observed for VMware Infrastructure virtual machine destinations, when you connect to a destination vCenter Server and select a destination datastore that has non-ASCII characters in its name.
Workaround: Connect directly to the destination ESX host instead of the vCenter Server.

4. Download and complete the conversion using vConverter v4.3 (works every time).

Tuesday, 30 April 2013

Configuring ISCSI port binding on vSphere using CLI


Configuring Port Binding on vSphere 5.0 Using CLI


Run the following commands from the vSphere 5.0 host CLI to bind the VMkernel network adapter to the  iSCSI adapter:

esxcli iscsi networkportal add --nic vmk0 --adapter vmhbaXX
esxcli iscsi networkportal add --nic vmk1 --adapter vmhbaXX


Where vmk0 and vmk1 are the VMkernel network adapters compatible with iSCSI port binding requirements.  You can get the list of VMkernel network adapters connected to  all vSwitches by using  the command   

esxcfg-vmknic –l


vmhbaXX  is the software iSCSI adapter vmhba ID. You can verify the binding details by using the  following command: 


esxcli iscsi networkportal list --adapter vmhbaXX.


Then rescan the software iSCSI adapter to verify that multiple paths are available for iSCSI LUNs.


Configuring Port Binding on vSphere 4.x Using CLI


To enable vmknic-based multipathing for software iSCSI, run the following CLI commands:

esxcli swiscsi nic add --nic vmk0 --adapter vmhbaXX
esxcli swiscsi nic add --nic vmk1 --adapter vmhbaXX


Where  vmk0 and  vmk1 are the VMkernel network adapters  compatible with iSCSI port binding requirements. You can get the list of VMkernel network  adapters connected to all vSwitches by using the command 

esxcfg-vmknic -l.


vmhbaXX is the software iSCSI adapter vmhba ID.  After configuring port binding, you can verify the binding details by using the following command: 


esxcli swiscsi nic list --adapter vmhbaXX. 


Then rescan the software iSCSI adapter to verify that multiple paths are available for iSCSI LUNs.


http://www.vmware.com/files/pdf/techpaper/vmware-multipathing-configuration-software-iSCSI-port-binding.pdf

Monday, 29 April 2013

Unable to find the system volume, reconfiguration is not possible, VMWARE P2V error

Applies to Windows Vista, 7, Server 2008, Server 2008 R2

To resolve this issue:
  1. Import the virtual machine to vCenter Server.
  2. Boot the virtual machine from the correct Microsoft Windows installation media (Correct architecture and version of the OS).
  3. Select the appropriate keyboard layout and language options and click Next.
  4. Click Repair your computer.
  5. Select the operating system to be repaired and click Next.
  6. Click the Command Prompt.
  7. Type bcdedit and press Enter.
  8. Under the Windows Boot Manager title with the identifier set to {bootmgr}, you may see that the device is set to boot.  Similarly, under the Windows Boot Loader with the identifier set to {default}, you may see that the device and osdevice are set to boot. These items should be set properly for your environment. Usually these appear as partition=C:.  In some cases the {default} identifier may have them set to partition=D:.

    Run these commands to correct the configuration:

    Note: bcdedit is located in the following path, c:\windows\system32
    bcdedit /set {bootmgr} device partition=C:

    bcdedit /set {default} device partition=C:

    bcdedit /set {default} osdevice partition=C:
  9. Type exit at the command prompt and select Shutdown.
  10. Try to reconfigure using VMware converter. The reconfigure should now complete successfully. If it fails again, repeat Steps 1 to 7 and then run these commands to set the default device to partition=D::

    bcdedit /set {bootmgr} device partition=C:

    bcdedit /set {default} device partition=D:

    bcdedit /set {default} osdevice partition=D:

Saturday, 27 April 2013

How to disable firewall command line?

To Disable:
netsh firewall set opmode disable

To Enable:
netsh firewall set opmode enable

How to clear preferred IP address

How to clear preferred IP address?

Step 1. Goto Start, Run, CMD to open a command prompt.
Step 2. Reset WINSOCK entries to installation defaults: netsh winsock reset catalog
Step 3. Reset TCP/IP stack to installation defaults. netsh int ip reset reset.log
Step 4. Reboot the machine.